
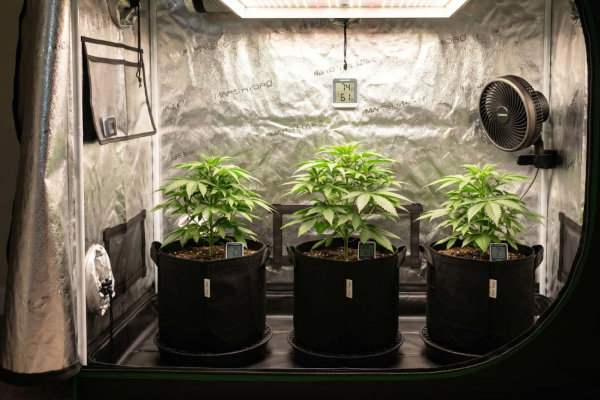
If you’re new to growing cannabis, starting indoors can feel like a big step, but it also gives you a real advantage. Instead of worrying about weather, seasons, or unpredictable outdoor conditions, indoor growing puts you in control. You can create a stable, comfortable environment for your plants and grow year-round, even if all you have is a small space like a closet or spare room.
This step-by-step guide is here to make your grow journey much easier. It’s designed to walk you through the best grow tent setup for beginners in a clear, practical way, breaking everything down so it actually makes sense.
A grow tent is basically a dedicated little room for growing cannabis indoors, designed to make the whole process easier, especially if you’re just getting started. It keeps everything you need in one place, so managing light, airflow, temperature, and humidity doesn’t feel overwhelming.
Why a Grow Tent Is the Best Place to Start Indoors
A grow tent is basically a dedicated little room for growing cannabis indoors, designed to make the whole process easier, especially if you’re just getting started. It keeps everything you need in one place, so managing light, airflow, temperature, and humidity doesn’t feel overwhelming.
For beginner growers, a grow tent helps create the best environment without having to control an entire room. It’s a simple, organized way to get into indoor growing, stay discreet, and set yourself up for more consistent results right from the start.
What You Need Before Setting Up a Grow Tent
Before you start assembling equipment, it helps to take a step back and think about where your grow tent will live and how it actually works. A little planning upfront makes the whole setup smoother and helps you avoid common beginner headaches later on.
Choosing the Right Space for Your Grow Tent
Your grow tent doesn’t need a massive area, but it does need the right spot. Many beginner growers use a spare bedroom, closet, basement corner, or even part of a garage. What matters most is that your grow room stays relatively stable and gives you enough control over the growing space.
Look for an area with easy access to power outlets, decent airflow, and minimal foot traffic. You’ll also want a space where temperature doesn’t swing wildly between day and night.
The good news is that grow tents are designed to work well in small spaces, so you don’t need to dedicate an entire room; just enough space to move around the tent and access your equipment comfortably.
Sorting Your Seeds Before Setup
Before anything gets assembled, it’s worth having your cannabis genetics sorted. Your tent, lights, and environment should match the plants you’re growing — and different seed types have different space, light, and humidity needs. If you’re not sure where to start, beginner weed seeds are bred to be forgiving, with stable growth patterns and manageable flowering times that suit a first indoor setup well.
Understanding Grow Tent Basics (For Total Beginners)
If you’re new to indoor growing, it helps to understand what grow tents are actually designed to do. Most grow tents are made with a sturdy frame, thick outer fabric, and a highly reflective interior. This setup helps trap light inside the tent, regulate airflow, and maintain consistent conditions so you can grow cannabis more efficiently.
Instead of trying to control an entire room, a grow tent lets you focus on a single, contained environment. That’s why they’re so beginner-friendly. Most grow tents also come with built-in ports for ventilation, cables, and ducting, making it easier to add lights, fans, and filters as you go, without complicated modifications or DIY work.
Choosing the Best Grow Tent for Beginners
Picking the right grow tent from the start makes everything else easier. You don’t need the biggest or most expensive option on the market; what matters is choosing a tent that fits your space, your goals, and your experience level as a beginner.
Grow Tent Sizes Explained (And Which One You Should Choose)
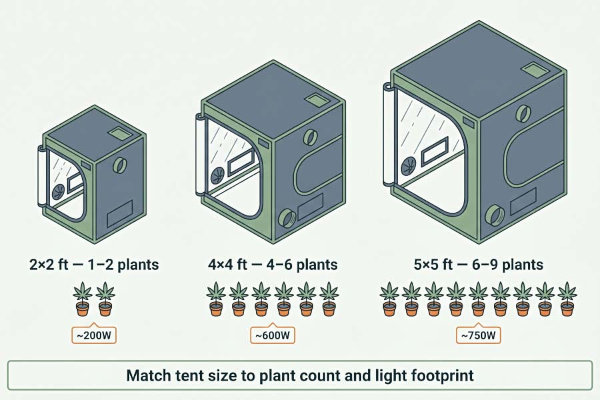
Grow tents come in a range of sizes, and the right one depends on how much room you have and how many plants you want to grow.
Smaller tents are perfect if you’re just starting out or planning to focus on a single plant. They’re easier to manage and cheaper to run. Larger tents, on the other hand, give you more flexibility as you gain confidence. There’s also more room to breathe, which makes temperature and airflow easier to control.
Here’s a quick breakdown of common grow tent sizes and what they’re best for:
- 2×2 ft – Great for beginners with limited space or one single plant
- 2×4 ft – Ideal for a couple of plants or a longer, narrow growing area
- 3×3 ft – A solid middle ground with room to work comfortably
- 4×4 ft – One of the most popular options for growers ready to scale up
- 5×5 ft and larger – Better suited for experienced setups and multiple plants
If you’re on the fence, going slightly bigger than your minimum needs is usually a smart move.
Key Features to Look for in a Beginner Grow Tent
- A sturdy frame that can support lights, fans, and filters
- Thick fabric with a reflective interior for better light efficiency
- Strong zippers that seal properly and don’t leak light
- Ventilation ports placed high and low for good airflow
- A waterproof tent floor to protect against spills
- Enough space inside the tent to access plants without feeling cramped
How to Assemble and Pitch a Grow Tent
Putting together a grow tent is usually much simpler than it looks. Many beginners start with a complete grow tent kit, which includes most of what you need and takes a lot of guesswork out of the process. Even if you’re following a basic grow tent setup guide, the steps are generally straightforward:
- Build the frame first and make sure it’s stable
- Pull the tent fabric over the frame and secure all corners
- Close the zippers and check for light leaks
- Make sure ventilation ports and access points are easy to reach
Most setups take under an hour, even if it’s your first time. Experienced growers might move faster, but beginners don’t need to rush. Taking your time now helps prevent problems later.
Choosing the Right Grow Lights for Your Tent
Cannabis lighting is one of the biggest factors behind healthy plants and strong yields for indoor growers. The right grow light provides the energy plants need for photosynthesis and helps drive vigorous plant growth from seedling to harvest.
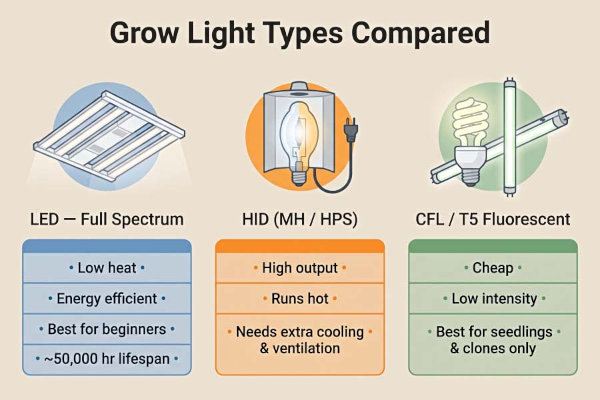
Inside a grow tent, your lights become the sun, so choosing the right ones makes a huge difference in how your plants develop.
Types of Grow Lights for Beginners
There are a few main types of grow lights commonly used for indoor growing. Each has its pros and cons, and some are far more beginner-friendly than others.
LED Grow Lights
- Energy-efficient and long-lasting
- Produce less heat, making them easier to manage
- Full-spectrum options work for all growth stages
- Higher upfront cost, but cheaper to run long term
HID Lights (HPS & MH)
- Mainly outdated. Nowadays used as supplemental light
- Generate a lot of heat and require extra ventilation
- Higher electricity use
- Better suited for more experienced growers
Fluorescent Lights (CFLs & T5s)
- Low heat output and inexpensive
- Easy to use for seedlings and early growth
- Limited power and penetration
- Not ideal for full-cycle grows
Best Grow Light Choice for Beginner Tent Setups
If you’re just getting started, a quality LED grow light is usually the safest and simplest option. LEDs are easy to install, don’t run as hot as other lights, and don’t require complex cooling systems. They also offer consistent coverage and full-spectrum lighting, which means you can use the same light from seedling through flowering.
When choosing an LED, focus on coverage rather than just wattage. Make sure the light is designed to properly cover your tent size, and avoid underpowered fixtures that can slow growth or cause plants to stretch. A slightly stronger light gives you more flexibility as your plants mature.
How to Hang and Position Grow Lights
Hanging your grow lights correctly is just as important as choosing the right one. Lights that are too close can harm plants, while lights that are too far away can lead to weak growth and tall, stretchy plants.
Here are a few key tips to keep in mind:
- Most manufacturers recommend hanging lights using adjustable ratchet hangers
- Start higher and lower the light gradually as plants grow
- Watch for signs of stress, like leaf curling or bleaching
- Make sure lights are centered to avoid uneven coverage
As you start dealing with taller plants, you’ll need to raise the light to maintain the proper distance. Always follow the manufacturer’s guidelines for recommended hanging heights, and double-check that cables are secure and that no light leaks escape from the tent during dark periods.
Ventilation and Airflow: Keeping Plants Healthy
Good ventilation is what keeps your grow tent running smoothly. Lights, plants, and equipment all affect the environment inside the tent, so you need a way to constantly refresh the air.
A proper setup moves fresh air in, pushes hot air out, and keeps conditions stable for healthy growth using a few simple ventilation components. Even a small grow tent benefits massively from consistent airflow.
At a basic level, ventilation helps with:
- Temperature control – Removing hot air produced by grow lights and equipment
- Humidity control – Preventing moisture from building up inside the tent
- Fresh CO₂ supply – Bringing in fresh air so plants can photosynthesize properly
- Preventing mold and pests – Reducing damp, stagnant conditions where problems thrive
Basic Grow Tent Ventilation Setup Explained
A standard grow tent ventilation setup is designed to keep air moving in one direction. Warm, stale air is pulled out through an exhaust system, while cooler air is drawn in through intake vents. This constant exchange helps maintain the right balance of temperature, humidity, and oxygen inside the tent.
Most beginner setups rely on an inline fan to pull air out of the tent, creating negative pressure that naturally draws fresh air in through lower vent openings. It’s simple, effective, and doesn’t require complicated equipment.
Choosing the Right Inline Fan for Beginners
Inline fans come in different sizes and strengths, usually measured in inches and airflow capacity. For beginners, the key is matching the fan size to your grow tent. A fan that’s too weak won’t remove enough heat, while one that’s too strong can dry plants out too quickly.
Go for one with adjustable speed, since it gives you more control and makes fine-tuning your environment a lot easier. As a general rule:
- Smaller tents usually work well with 4-inch fans
- Medium to larger tents often need 6-inch fans
- Stronger lights typically require stronger airflow
Carbon Filters and Odor Control
As plants mature, especially during flowering, odor becomes a real consideration. A carbon filter attaches directly to your inline fan and scrubs smells from the air before it exits the tent. Even beginner growers often use one from the start, just to avoid surprises later.
Installing a carbon filter early also helps create better airflow and keeps your setup discreet, which is a big plus for indoor growing.
Installing Your Ventilation System Step-by-Step
Setting up ventilation might sound technical, but it’s actually pretty straightforward:
- Mount the carbon filter inside the tent near the top
- Connect the inline fan directly to the filter or with short ducting
- Run ducting out through the upper vent port
- Make sure intake vents at the bottom are open
Once everything is connected, turn the system on and feel for airflow. You should notice warm air being pulled out and fresh air entering naturally. After that, it’s just a matter of adjusting fan speed until the environment feels stable.
Grow Tent Accessories That Make Life Easier
Once your tent, lights, and ventilation are in place, a few extra accessories can make a big difference in how smooth your grow runs. These tools go beyond saving time. They help indoor growers keep conditions consistent and avoid problems before they start.
Timers – Automating Your Light Schedule
Timers are one of the simplest but most important tools for indoor growers. Plants rely on consistent light cycles, and a timer takes the guesswork out of turning lights on and off at the same time every day. Once it’s set, it does the work for you.
Most beginners choose between basic mechanical timers and digital timers. Both work well, as long as they’re reliable. The key is matching the timer to your light schedule and sticking with it. Automation here isn’t about being fancy, it’s about consistency.
Environmental Controllers (Optional but Helpful)
Environmental controllers help manage key environmental factors like temperature and humidity in your grow tent. Instead of manually adjusting fans or equipment, a controller can turn devices on or off automatically to keep things in range.
For beginner growers, these tools aren’t mandatory, but they can be helpful if you’re trying to grow plants in a space where conditions change a lot. Keeping stable humidity levels and temperatures makes it easier for plants to thrive and reduces stress throughout the grow cycle.
Circulation Fans – Preventing Stagnant Air
While exhaust fans handle air exchange, circulation fans are all about movement inside the tent. Small clip-on fans are commonly used to keep air gently flowing around the canopy.
This steady air movement helps strengthen cannabis plants, prevents moisture from settling on leaves, and reduces the risk of mold. Fans should never blast directly at plants. Instead, aim for a light, constant breeze that mimics natural outdoor conditions.
Measuring and Monitoring Your Grow Environment
One of the biggest advantages of growing indoors is being able to see exactly what’s happening around your plants. A few simple measurement tools give you a clear picture of conditions inside your indoor grow room, so you can spot issues early and make small adjustments before they turn into bigger problems.
Essential Measurement Tools for Beginners
You don’t need a lot of gadgets to get started. Most beginners can manage just fine with a couple of basic tools:
- Thermometer: Lets you keep track of daytime and nighttime temperatures
- Hygrometer: Measures humidity levels inside the grow tent
- Digital combo meters: Combine temperature and humidity in one easy-to-read display
These tools are inexpensive, easy to use, and incredibly helpful when you’re learning how your grow space responds to lights, airflow, and watering.
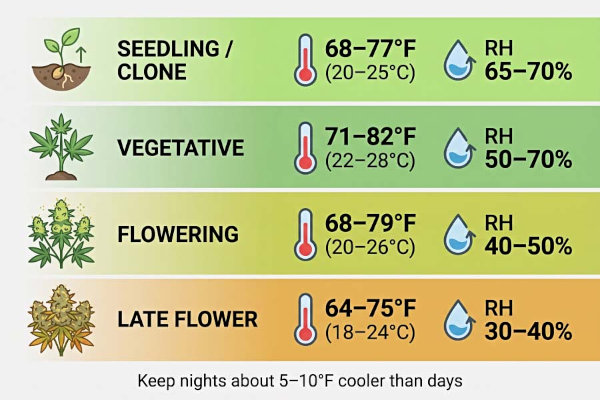
Understanding Ideal Temperature and Humidity Ranges
Plants prefer different conditions at different stages of growth, but the goal is always consistency. Big swings in temperature or excess humidity can slow growth and invite issues like mold.
As a general guideline:
- Seedlings like slightly warmer temperatures and higher humidity
- Vegetative plants prefer moderate temperatures and steady humidity
- Flowering plants need lower humidity to avoid moisture-related problems
By checking your readings daily, you’ll start to recognize patterns and understand how changes in your setup affect the environment.
Optional Tools for More Control
As you gain experience, you might decide to add a few extra tools for tighter control. pH meters and TDS or EC meters help monitor nutrient strength and water quality, but they’re not essential right away.
For beginners, it’s better to focus on mastering temperature and humidity first. Once you’re comfortable managing those basics, adding more tools becomes a lot less intimidating.
Electrical Safety and Power Management
Electricity is one part of growing cannabis indoors that’s worth taking seriously. You don’t need advanced knowledge or special wiring, but a few smart habits go a long way in keeping your setup safe, reliable, and stress-free.
The goal is simple: power everything properly and avoid pushing your equipment (or your outlets) too hard.
Power Requirements for a Beginner Grow Tent
Most beginner grow tents don’t use as much power as people expect, especially if you’re running modern LED lights. Still, it’s important to know roughly how much electricity your setup needs so you don’t overload a single outlet or circuit.
Take a moment to add up the wattage of your main equipment:
- Grow lights
- Inline fan
- Circulation fans
- Controllers or timers
Once you know the total, plug everything into a quality surge protector instead of directly into the wall. This helps protect your gear from power spikes and gives you a single place to shut everything off if needed. Avoid using cheap extension cords, and never daisy-chain power strips together.
Safe Cable Management Inside a Grow Tent
Good cable management isn’t just about staying organized. It’s a safety issue. Water, heat, and electricity don’t mix well, so keeping cords tidy really matters.
Here are a few simple rules to follow:
- Keep power strips and plugs off the tent floor
- Route cables along the tent poles using zip ties or clips
- Make drip loops so water can’t run down cords into outlets
- Keep cables away from hot equipment like lights and ballasts
Taking a few extra minutes to organize cords makes your grow tent easier to work in and reduces the risk of accidents. If something ever looks worn, loose, or damaged, replace it right away.
Common Beginner Mistakes (And How to Avoid Them)
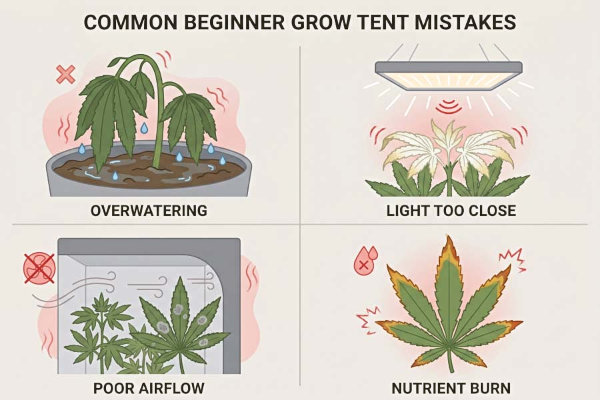
Every grower makes mistakes in the beginning, which is part of the learning process. The good news is that most beginner problems come from a handful of common issues that are easy to fix once you know what to look for.
Choosing a Tent That’s Too Small
One of the most common mistakes is underestimating how much space plants actually need. A tent that feels roomy at the seedling stage can get cramped fast once plants start stretching and filling out. Tight spaces make airflow harder to manage and maintenance more frustrating.
How to avoid it:
If you’re deciding between two sizes, go slightly bigger. Extra space makes temperature control, lighting, and access much easier.
Underpowered or Poorly Positioned Lighting
Light is fuel for plant growth, and weak lighting leads to thin, stretchy plants and disappointing results. Hanging lights too far away—or too close—can also cause problems.
How to avoid it:
Choose a grow light designed for your tent size and follow the manufacturer’s hanging recommendations. Adjust gradually as plants grow and watch how they respond.
Ignoring Airflow and Ventilation
Beginners sometimes focus heavily on lights and forget about adequate airflow. Without proper ventilation, heat and humidity build up quickly, increasing the risk of mold, pests, and stressed plants.
How to avoid it:
Make sure air is constantly moving through the tent. Use an exhaust fan, keep intake vents open, and add circulation fans to prevent stagnant air.
Overcomplicating the Setup
It’s easy to get overwhelmed by equipment and try to automate everything at once. More gear doesn’t always mean better results, especially early on.
How to avoid it:
Start with the basics and learn how each part of your setup works. You can always add upgrades later once you understand what your grow actually needs.
Not Monitoring Conditions Regularly
Even a well-built setup needs regular attention. Ignoring temperature and humidity readings can lead to problems that sneak up on you.
How to avoid it:
Check your meters daily and make small adjustments as needed. Consistency matters more than perfection.
Final Tips for First-Time Grow Tent Success
- Start Simple: You don’t need a complicated setup to get good results. Focus on the basics (light, airflow, and consistency) before adding extra gear.
- Upgrade Over Time: Your first grow is about learning. Once you understand how your tent behaves, you can upgrade lights, fans, or controllers with confidence.
- Monitor Daily: A quick daily check of temperature, humidity, and equipment helps catch small issues before they turn into real problems.
- Adjust Gradually: When something needs fixing, make small changes and give plants time to respond. Sudden adjustments often cause more stress than they solve.
- Take Notes: Keeping simple notes about light height, feeding, and environmental changes makes each grow easier and more successful than the last.
- Quality Genetics Matter: Even the best setup can’t fix poor genetics. Starting with reliable seeds gives you a much better chance of a smooth, rewarding grow.